
Desserts
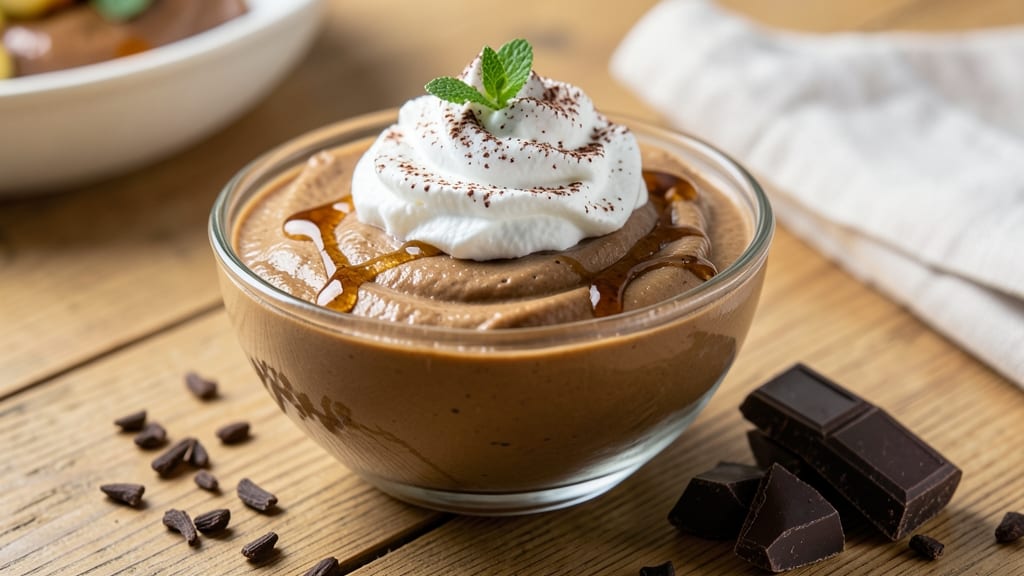
This chickpea chocolate mousse recipe proves vegan desserts can be just as luxurious as their dairy-laden counterparts—silky, rich, and completely guilt-free. 💛 The secret lies in aquafaba (chickpea liquid), which whips into a stable, airy base that mimics egg whites perfectly, creating a texture so smooth it’ll fool even the most skeptical chocolate lovers.
What makes this recipe truly special is how it transforms humble chickpeas into a decadent dessert without compromise. By blending aquafaba with melted dark chocolate and sweetener, then gently folding in whipped cream, you create a mousse that’s velvety yet light—no eggs, no dairy, no heavy cream required.
The result? A dessert that’s as elegant as it is ethical, with a deep cocoa flavor that satisfies every chocolate craving.
This mousse is foolproof for special occasions or spontaneous cravings—just blend, chill, and serve. Top with fresh berries for a pop of color, toasted coconut flakes for crunch, or a sprinkle of sea salt to enhance the chocolate’s richness.
The best part? It’s ready in under 10 minutes of active time, with just 30 minutes of chilling to achieve that perfect, set-but-still-silky consistency.
Whether you’re vegan, allergic to dairy, or simply looking for a lighter dessert option, this recipe delivers restaurant-quality results at home. The texture is the star—creamy yet airy, with a melt-in-your-mouth finish that makes it impossible to stop at one serving. Let’s make this mousse!
Ingredients for chickpea chocolate mousse
Six ingredients transform chickpea liquid into luxurious vegan chocolate mousse.
| Ingredient | Amount | Notes |
|---|---|---|
| Canned Chickpeas (Aquafaba) 🥫 | 1 ½ cups | Liquid only, no chickpeas |
| Dark Chocolate Bars 🍫 | 8 oz | 70% cocoa minimum, vegan |
| Maple Syrup 🍯 | ½ cup | Grade B for richer flavor |
| Vanilla Extract 🌿 | 1 tbsp | Pure Madagascar bourbon |
| Pinch of Salt 🧂 | ¼ tsp | Fine sea salt preferred |
| Coconut Whipped Cream 🥥 | 2 cups | Chilled, full-fat coconut cream |
| Fresh Raspberries 🍓 | 1 cup | For garnish, optional |
| Toasted Coconut Flakes 🥥 | ¼ cup | Unsweetened, lightly toasted |
| Flaky Sea Salt 🧂 | 1 tsp | For garnish, optional |
| Lemon Juice 🍋 | 1 tsp | Freshly squeezed |
The aquafaba is the magic ingredient—save it from your canned chickpeas or buy it pre-packaged at Whole Foods or Trader Joe's. Look for dark chocolate bars with at least 70% cocoa; Lindt Excellence or Alter Eco brands deliver consistent quality. Maple syrup adds depth, but agave nectar works too if preferred. The coconut whipped cream must be full-fat for proper texture—Goya or So Delicious brands are reliable. Fresh raspberries brighten the dish, but frozen works in a pinch if thawed and drained.
No aquafaba? Vegan whipped aquafaba substitute (1 tbsp cornstarch + 1 tbsp sugar + 1 cup water, whipped) mimics the texture. Dark chocolate unavailable? Vegan chocolate chips (like Enjoy Life brand) melt just as well. The coconut whipped cream can be replaced with cashew cream (soak 1 cup cashews overnight, blend with 1 cup water + 1 tbsp maple syrup). For extra richness, add 1 tbsp coconut oil to the melted chocolate. The lemon juice stabilizes the mousse—don't skip it, even though it's just a splash.
Store the mousse in an airtight container with parchment between layers for up to 5 days in the fridge. Freeze for 3 months if desired—thaw at room temperature before serving. The whipped coconut cream should be chilled until use. Garnishes keep best in the fridge: store raspberries in a sealed container with a paper towel, and toast coconut flakes just before serving for maximum crunch. Serve immediately after chilling for optimal texture.
Why You'll Love This Recipe
- Zero Special Tools: I just use a hand mixer and a food processor—no fancy gadgets, no stress. The aquafaba (that chickpea juice) whips up like magic into silky peaks, and the dark chocolate melts in minutes. Honestly, my blender’s seen better days, but this recipe doesn’t care.
- Rich Without Guilt: That first bite? Smooth, fudgy, and packed with deep cocoa flavor—but here’s the twist: it’s secretly healthy. The chickpeas add protein, the maple syrup keeps it naturally sweet, and the vanilla makes it taste like a bakery treat. I’ll be real: my kids ask for seconds, but I sneak extra bites too.
- Date-Night Ready: Dress it up with whipped cream and berries, or keep it simple with a sprinkle of sea salt. It’s the kind of dessert that feels fancy but doesn’t require hours. Between us, I’ve served this to friends who swore it was from a patisserie—until I told them the secret ingredient was canned chickpeas. (They still loved it.)
- Pantry Staple Magic: You’re already stocked for this. Open a can, melt some chocolate, and boom—dessert. No last-minute grocery runs, no wasted ingredients. I make a big batch on Sundays and keep it in the fridge for when I’m too tired to bake. Even my picky husband doesn’t complain. (Yes, even on a Tuesday night.)
Step-by-step instructions for chickpea chocolate mousse
Here's how to create a velvety vegan mousse using simple pantry staples.
🍳 Step 1: Prepare the Aquafaba Base
Drain the 1.5 cups Canned Chickpeas (Aquafaba) completely, reserving only the liquid. Transfer the aquafaba to a heatproof bowl and place it over a pot of simmering water (double boiler method). Heat gently for 5-7 minutes until the temperature reaches 160°F—you'll see bubbles form and the liquid thicken noticeably.
Remove from heat immediately and let it cool to room temperature. This step transforms the aquafaba into a stable meringue-like base. I like to use a kitchen thermometer for accuracy—overheating can cause it to curdle. Once cooled, whisk in the 1 tbsp Vanilla Extract and 0.25 tsp Pinch of Salt until fully incorporated. The mixture should thicken to a glossy, ribbon-like consistency that holds its shape when drizzled.
🍫 Step 2: Melt and Temper the Chocolate
Finely chop the 8 oz Dark Chocolate Bars into small, even pieces. Place half of the chocolate in a heatproof bowl and set it over the same simmering water (double boiler) used for the aquafaba. Heat gently, stirring constantly, until the chocolate melts completely—this should take about 4-5 minutes. Remove from heat and set aside.
In a separate bowl, mix the remaining chopped chocolate with the 0.5 cup Maple Syrup and 1 tsp Lemon Juice. This creates a tempering mixture that prevents the chocolate from seizing when combined with the cooled aquafaba. Gradually whisk the melted chocolate from the first bowl into this mixture until smooth and fully combined. The final chocolate mixture should be thick but pourable, with a glossy sheen that indicates proper tempering.
🥘 Step 3: Combine and Whip to Silky Perfection
With a stand mixer fitted with the whisk attachment, combine the cooled aquafaba mixture and the tempered chocolate. Mix on medium speed for 2-3 minutes until the mixture thickens and lightens in color. This gradual incorporation prevents the chocolate from seizing and creates the signature airy texture of mousse. Scrape down the sides of the bowl occasionally to ensure even mixing.
Increase the speed to high and whip for an additional 3-4 minutes until the mixture becomes light, fluffy, and holds soft peaks when the whisk is lifted. You're looking for a texture similar to whipped cream but with the rich, velvety body of traditional chocolate mousse. If the mixture feels too thick, add 1 tablespoon of coconut whipped cream at a time until it reaches the desired consistency.
🍽️ Step 4: Fold in Coconut Whipped Cream
In a separate bowl, whip the 2 cups Coconut Whipped Cream until it forms stiff peaks. Using a spatula, gently fold one-third of the whipped cream into the chocolate mixture to lighten it. Then, fold in the remaining whipped cream until fully incorporated and the mousse achieves a smooth, airy consistency. Be careful not to overmix—this can deflate the whipped cream and make the mousse dense.
Divide the mousse evenly among 6 serving glasses or ramekins. For a marbled effect, gently swirl in a small spoonful of the reserved chocolate mixture before it sets. Cover and refrigerate for at least 4 hours (or overnight) until fully set. The longer it chills, the more intense the flavors become.
🎨 Step 5: Garnish and Serve
Before serving, top each portion with 1 tablespoon of Toasted Coconut Flakes, a sprinkle of 1 tsp Flaky Sea Salt, and 2-3 Fresh Raspberries. The toasted coconut adds a delightful crunch contrast, while the flaky salt enhances the chocolate's richness. Serve immediately after removing from the refrigerator for the perfect balance of cold, creamy mousse and fresh fruit.
This mousse holds its shape beautifully and delivers a luxurious mouthfeel without any dairy or eggs. The acidity from the lemon juice brightens the chocolate, while the maple syrup adds depth and natural sweetness. Each bite should be smooth, rich, and perfectly balanced—proof that plant-based desserts can rival traditional recipes in both texture and flavor.
Pro Tips For Making Chickpea Chocolate Mousse
- Drain and Rinse Aquafaba: Your canned chickpeas will have that starchy liquid—don’t skip rinsing it off. The extra starch makes your mousse grainy, and nobody wants a gritty dessert. Just drain, give it a quick shake in the jar, and rinse once under cold water before using.
- Melt Chocolate Slowly: I used to dump chocolate straight into hot liquid and end up with seizing or weird textures. Instead, melt it in 30-second bursts in the microwave—stir, rest, repeat—until just smooth. This keeps the chocolate from burning or turning greasy.
- Whip Aquafaba to Stiff Peaks: If you’re using a hand mixer, don’t rush it. Whip the aquafaba until it holds soft peaks, then fold in the melted chocolate gently. If you stop too early, your mousse will collapse; if you overmix, it’ll turn tough. Patience here makes all the difference.
- Chill Before Serving: This isn’t optional. Let the mousse sit uncovered in the fridge for at least 4 hours—or overnight—so it sets properly. Skipping this step means a wobbly, underwhelming texture. Trust me, the wait is worth it.
Pro cooking tips for this recipe
Double Boiler Mastery
Use a double boiler for both the aquafaba and chocolate to prevent overheating or seizing. I recommend a stainless steel bowl over glass—it conducts heat more evenly. Keep the water at a gentle simmer (not a rolling boil) to maintain precise temperature control.
For the chocolate, chop it into small, even pieces to ensure uniform melting. 🌡️
Temperature Control
Monitor the aquafaba's temperature with a kitchen thermometer—it should reach 160°F but not exceed 170°F. Overheating causes curdling, ruining your mousse. For the chocolate, work in two batches if needed to avoid overheating.
The tempered chocolate should have a glossy sheen and be thick but pourable. If it looks grainy, whisk in 1 tsp coconut oil to smooth it out.
Whipping Technique
Use a stand mixer with the whisk attachment for best results—hand mixers can overheat the aquafaba. Start on medium speed to combine ingredients, then increase to high only after the mixture thickens.
Whip until the mousse holds soft peaks (about 3-4 minutes). If it feels too thick, add 1 tbsp coconut whipped cream at a time—never water or milk substitutes.
Chilling Time
Refrigerate the mousse for at least 4 hours—overnight is ideal. The longer it chills, the more intense the flavors become. Use ramekins or serving glasses with straight sides for easy unmolding. If serving immediately, let it sit at room temperature for 10-15 minutes to soften slightly before garnishing. 💫
Garnish Like a Pro
Toast coconut flakes in a dry pan over medium heat for 2-3 minutes until golden—this enhances their flavor. Sprinkle flaky sea salt just before serving to highlight the chocolate’s richness.
For extra flair, drizzle with melted dark chocolate or add edible flowers like pansies. The contrast of textures (creamy, crunchy, juicy) makes every bite exciting.
Avoid Common Pitfalls
Never skip the lemon juice—it stabilizes the mousse and balances sweetness. If your chocolate seizes, whisk in 1 tsp coconut oil or 1 tbsp aquafaba to rescue it.
For extra stability, chill the bowl in the fridge for 5 minutes before whipping. Store leftovers in an airtight container with parchment between layers to prevent drying. 💡
Nutrition facts
Frequently asked questions
Why does this recipe use aquafaba instead of eggs?
Aquafaba (chickpea liquid) creates the perfect egg-white substitute—it whips into stable, airy peaks that give this mousse its signature silky texture. Chickpeas are naturally rich in proteins that coagulate when heated, mimicking egg whites' structure. Plus, it's a zero-waste ingredient that reduces food scraps while delivering professional results.
Can I make this mousse without a stand mixer?
Yes! Use a hand mixer or even a whisk with strong arm muscles. Work in 1-minute bursts to avoid overheating the aquafaba. For best results, chill your mixing bowl in the freezer for 5 minutes before starting—this helps stabilize the mixture. The texture will be slightly less light but still delicious.
What if my chocolate seizes when mixing?
Don't panic! Seized chocolate happens when moisture disrupts the cocoa butter. Rescue it by whisking in 1 teaspoon coconut oil or 1 tablespoon aquafaba while heating gently (double boiler method). Stir constantly until smooth. The lemon juice in the recipe actually helps prevent this—just be patient and keep temperatures controlled.
How do I adjust the sweetness for kids?
Add 1-2 tablespoons maple syrup to the chocolate mixture while it's still warm. For extra richness, fold in 1 tablespoon powdered sugar with the whipped coconut cream. Kids love the contrast of chocolate with sweet toppings—try adding mini marshmallows or crushed Oreos on top for fun texture.
Can I make this ahead for a party?
Prepare the mousse 1 day ahead and store in an airtight container with parchment between layers. Garnish just before serving to keep toppings fresh. For the best texture, let it sit at room temperature for 15 minutes before serving—this softens the edges while keeping the center cool and creamy.